- Australia ▾
- Topographic
▾
- Australia AUSTopo 250k (2025)
- Australia 50k Geoscience maps
- Australia 100k Geoscience maps
- Australia 250k Geoscience maps
- Australia 1:1m Geoscience maps
- New Zealand 50k maps
- New Zealand 250k maps
- New South Wales 25k maps
- New South Wales 50k maps
- New South Wales 100k maps
- Queensland 10k maps
- Queensland 25k maps
- Queensland 50k maps
- Queensland 100k maps
- Western Australia 25k maps
- Western Australia 50k maps
- Western Australia 100k maps
- Compasses
- Software
- GPS Systems
- International ▾
- Wall Maps
▾
- World
- Australia & New Zealand
- Countries, Continents & Regions
- Historical
- Vintage National Geographic
- Australian Capital Territory
- New South Wales
- Northern Territory
- Queensland
- South Australia
- Tasmania
- Victoria
- Western Australia
- Celestial
- Children's
- Mining & Resources
- Wine Maps
- Healthcare
- Postcode Maps
- Electoral Maps
- Nautical ▾
- Flags
▾
- Australian Flag Sets & Banners
- Flag Bunting
- Handwavers
- Australian National Flags
- Aboriginal Flags
- Torres Strait Islander Flags
- International Flags
- Flagpoles & Accessories
- Australian Capital Territory Flags
- New South Wales Flags
- Northern Territory Flags
- Queensland Flags
- South Australia Flags
- Tasmania Flags
- Victoria Flags
- Western Australia Flags
- Gifts ▾
- Globes ▾
Dear valued customer. Please note that our checkout is not supported by old browsers. Please use a recent browser to access all checkout capabilities


Map of Australia & New Zealand Shewing The Routes of the Explorers published 1872
$69.95
or make 4 interest-free payments of
$17.49 AUD
fortnightly with
![]() More info
More info
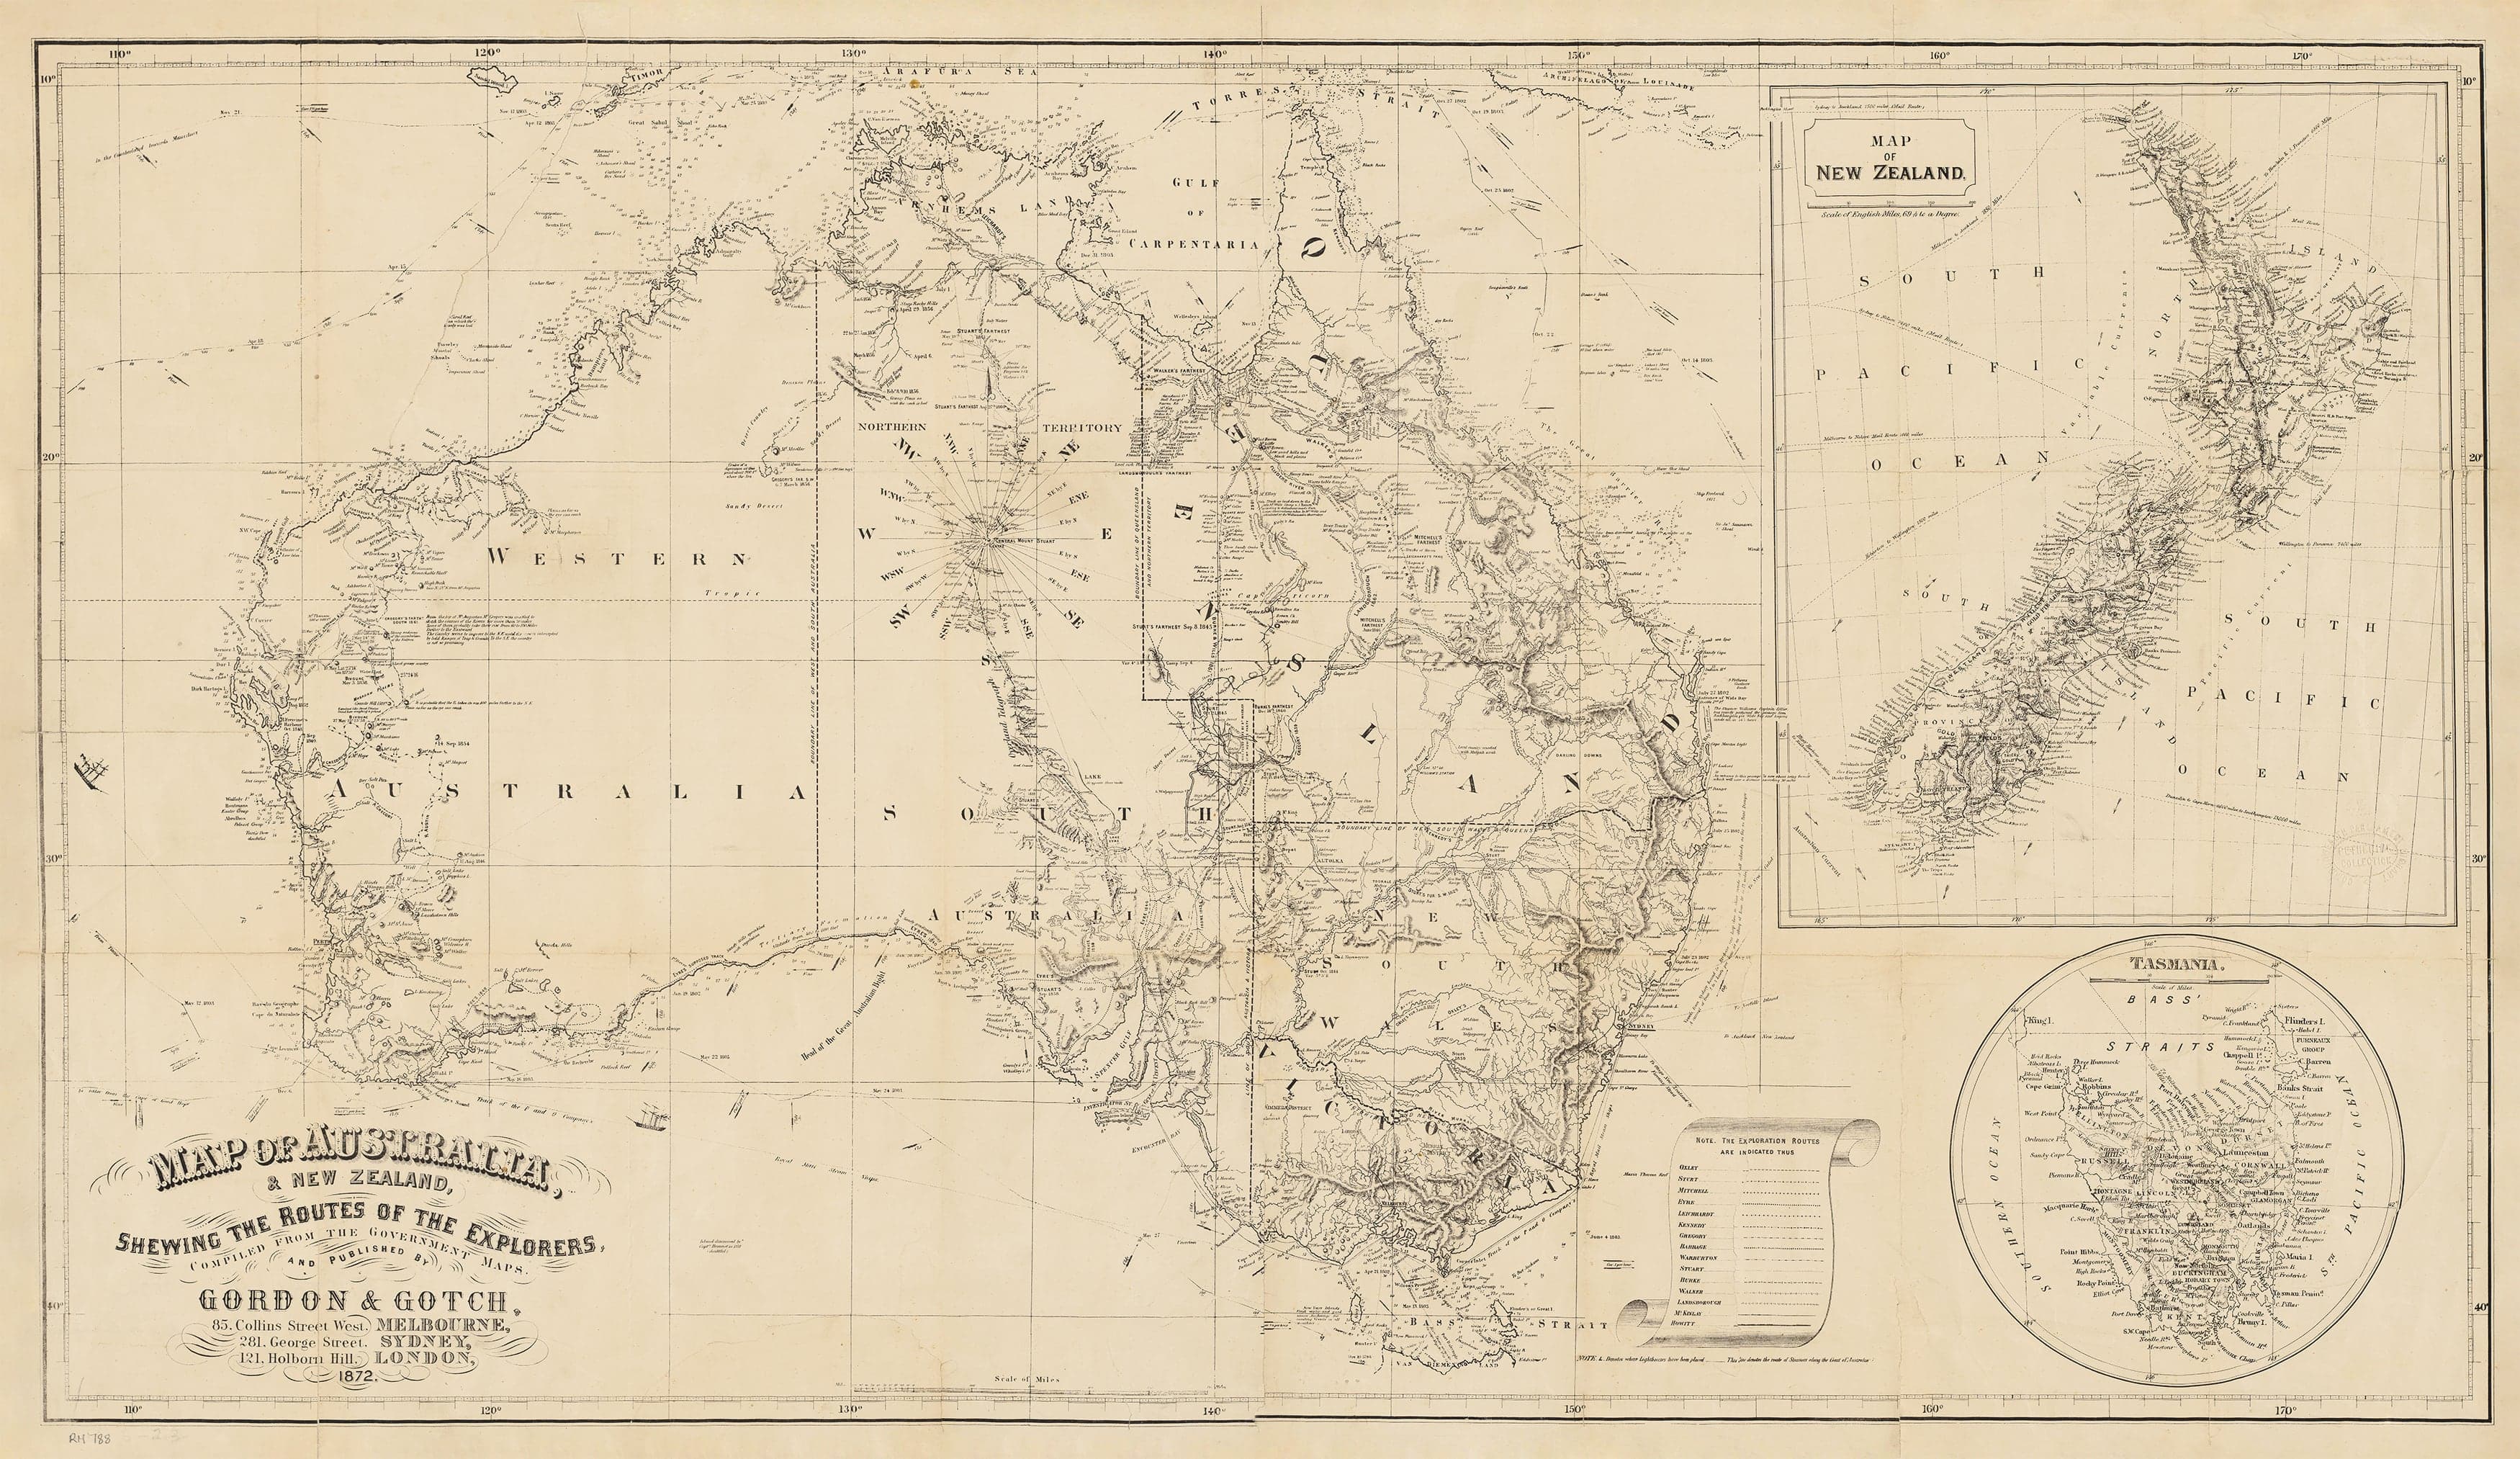
Map of Australia & New Zealand Shewing the Routes of the Explorers — Wall Map (1872)
Sailing wakes and camel tracks, riverboats and dry creeks—this 1872 Gordon & Gotch classic draws the twin stories of Australia and New Zealand into one sweeping chronicle of exploration. From the coastal tracks of Cook and Flinders to the inland lines of Sturt, Stuart, Leichhardt, and Burke & Wills, the map threads courage through distance, turning two great southern lands into a living atlas of first routes, hard lessons, and changing horizons.
Why it captivates
-
A faithful 1872 portrait compiled from official government surveys and charts available at the time.
-
Clear route-lines for key maritime and inland expeditions across Australia and New Zealand.
-
Period-authentic Victorian typography, engraving, and decorative linework with refined restraint.
-
A statement piece that blends scholarship with strong visual presence.
What you’ll see
-
Major exploration routes across Australia & New Zealand, labelled with explorers’ names and paths.
-
Coastal ship tracks and circumnavigations marking early maritime discovery.
-
Early settlements and colonial regions set against the routes that reached or defined them.
-
Period cartouche and borders that frame the geography without crowding detail.
A richer historical frame
Issued in 1872, this map captures an era when the colonial picture of Australasia was still being stitched together—coastlines largely known, interiors newly connected by hard-won tracks and speculative rivers. Gordon & Gotch distilled government surveys into a single reference that is part logbook, part landmark: a visual ledger of how two territories were seen, crossed and argued into clearer shape.
Choose your finish
Heavyweight Paper (160 gsm matte)
Best for: framing under glass in studies and living spaces
Look & feel: non-glare matte that preserves engraved linework and small labels
Laminated (true encapsulation)
Best for: classrooms, libraries, offices and shared spaces
Build: sealed edge-to-edge between two 80-micron gloss sheets
Benefit: wipe-clean, durable, moisture-resistant
Laminated + Timber Hang Rails (Ready to hang)
What you get: encapsulated print plus natural lacquered timber rails top & bottom with a discreet hanging cord
Where it shines: foyers, schools, museums—polished look with everyday toughness
Install: arrives ready to hang (just add a wall hook)
Lead time: please allow up to 10 working days for professional rail mounting
Archival Canvas (395 gsm HP Professional Matte)
Best for: premium interiors, galleries and boardrooms
Print system: pigment-based, fade-resistant inks for long display life
Presence: textured surface adds warmth and museum-style depth
Canvas + Timber Hang Rails (Gallery-ready)
What you get: canvas fitted with natural timber rails top & bottom, matching cord
Where it shines: statement walls, curated Australiana displays
Install: ready to hang; single-hook friendly
Lead time: please allow up to 10 working days for rail mounting
Sizes (W × H)
-
970 × 560 mm — balanced feature with ample route detail
-
1500 × 870 mm — commanding centrepiece for galleries and public spaces
At-a-glance materials
| Option | Best for | Key benefits |
|---|---|---|
| Paper (160 gsm) | Framing under glass | Matte clarity; crisp engraving detail |
| Laminated (encapsulated) | Busy/shared spaces | Wipeable; tough; edge-to-edge protection |
| Laminated + Rails | Ready-to-hang public display | Professional mount; easy install; durable |
| Canvas (395 gsm) | Premium display | Archival inks; textured depth; gallery appeal |
| Canvas + Rails | Gallery-ready feature | Period-true presentation; simple hanging |
Styling ideas
-
Exploration wall: pair with a caption card noting your favourite routes or landfalls.
-
Research nook: frame the paper edition and keep a magnifier handy for route annotations.
-
Public foyer: select Laminated + Rails for polished, durable display.
-
Curated interior: canvas with rails above timber cabinetry for warm, Victorian character.
Specifications
| Detail | Description |
|---|---|
| Title | Map of Australia & New Zealand Shewing the Routes of the Explorers — Wall Map |
| Edition | 1872 |
| Publisher | Gordon & Gotch, Melbourne |
| Sources | Compiled from official government maps and survey records available at the time |
| Content Highlights | Major overland & maritime routes; explorers’ names & paths; ship tracks; early settlements & colonial regions |
| Style | Period-authentic Victorian typography and linework |
| Finishes | Paper; Laminated (encapsulated); Laminated + Timber Rails; Canvas; Canvas + Timber Rails |
| Lead Time (Rails) | Up to 10 working days (laminated or canvas with rails) |
| Orientation | Landscape |
| Sizes | 970 × 560 mm; 1500 × 870 mm |
| Production | Made in Australia |
Who it’s for
-
Collectors and historians of Australasia’s exploration era
-
Educators, libraries & museums teaching maritime and inland discovery
-
Interior designers seeking a refined Victorian statement with scholarly depth
Claim your wall. Choose Paper for crisp, frame-ready clarity. Go Laminated + Timber Rails for tough, ready-to-hang polish. Step up to Archival Canvas + Timber Hang Rails for gallery weight. Printed in Australia with pigment-based, fade-resistant inks. Built to last. Hang it. Live with it. Keep discovery close.
Frequently Asked Questions
What are the dimensions of the Map of Australia & New Zealand Shewing The Routes of the Explorers pub?
Mapworld wall maps range from standard 700×1000mm to large-format 1000×1430mm Supermaps. The exact dimensions for this map are shown in the product title. Where multiple sizes are available, select your preferred size when adding to cart.
Is this wall map available laminated?
Many Mapworld wall maps are available in paper, laminated, or framed finishes. Check the product options when adding to cart. Laminated maps are wipe-clean and more durable.
Is this the latest edition?
Mapworld stocks the most current editions available from all publishers. Edition year is shown in the product title where applicable. Mapworld updates its catalogue as new editions are released.
Can I write on or pin this wall map?
Laminated wall maps can be written on with whiteboard markers and wiped clean. Paper maps can be pinned on a corkboard. Choose a laminated option for a writeable surface.
Does Mapworld ship the Map of Australia & New Zealand Shewing The Routes of the Explorers pub across Australia?
Yes, Mapworld ships Australia-wide. Standard shipping is a flat $7 rate, with free standard shipping on orders over $75. Express options are available at checkout. Most orders placed before 2pm AEST on weekdays are dispatched same day.
Related Items

© 2026 Mapworld. Website designed by Genie Media
X