

Australia — East Coast, Halifax Bay to Double Point & the Barrier Reefs (1843–48)
The Admiralty chart that revealed Queensland’s reef-lined coast
Before the Great Barrier Reef was mapped, it was a lethal maze. Between Halifax Bay and Double Point, northern Queensland’s coast was a complex barrier of coral, shoals and uncharted channels that stopped ships and claimed lives. This extraordinary British Admiralty chart, surveyed between 1843 and 1848 by the crews of HMS Fly and HMS Rattlesnake, marks the moment when this dangerous coastline was finally measured, charted and made navigable.
Led by Captain Francis Price Blackwood and Captain Owen Stanley, and engraved by F. & C. Walker, this was the chart that allowed mariners to safely pass through one of the most difficult stretches of the Great Barrier Reef.
This is not a decorative map.
It is the blueprint that opened Far North Queensland to the sea.
⚓ What This Chart Shows
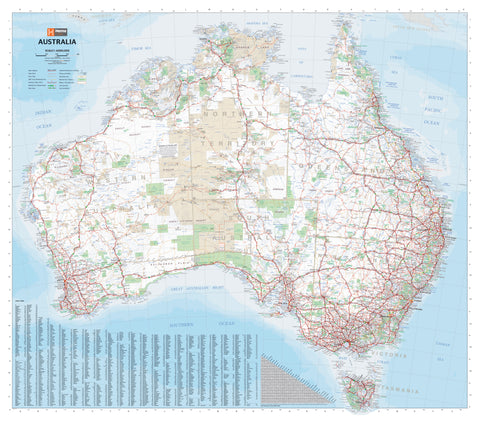
This finely engraved Admiralty sheet lays out one of Australia’s most complex marine environments.
-
The northeast Queensland coast from Halifax Bay to Double Point
-
The Great Barrier Reef system plotted in extraordinary detail
-
Detached reefs, coral heads and shoals
-
Hundreds of bathymetric soundings showing safe depths and hazards
-
Coastal relief shown by hachures and spot heights
-
Greenwich prime meridian — true Admiralty navigation standard
This was the chart captains relied on when threading their way through the reef for the first time.
🧭 Why This Chart Works
Most reef maps show where coral lies.
This shows where ships could survive.
-
Surveyed by HMS Fly and HMS Rattlesnake — legendary survey vessels
-
Compiled from years of dangerous reef exploration
-
True British Admiralty production — the gold standard of navigation
-
Dense technical detail — soundings, shoals and channels
-
Museum-grade engraving by F. & C. Walker
This is the chart that turned Queensland’s northern coast from a maritime hazard into a navigable frontier.
✨ Premium Finishes
Every Halifax Bay to Double Point (1843–48) Admiralty Chart is printed in Australia using archival methods to preserve every fine engraved line and depth figure.
| Format | Description |
|---|---|
| 📜 Paper (160 gsm matte) | Smooth heavyweight archival paper with exceptional line clarity. Ideal for framing under glass. |
| 🧼 Laminated (True Encapsulation) | Sealed between 2 × 80-micron gloss laminate for full edge-to-edge protection. Tear-resistant and wipe-clean — perfect for clubs and offices. |
| 🖼️ Canvas (395 gsm HP Professional Matte) | Printed on premium HP canvas using pigment-based, fade-resistant inks for a warm, gallery-grade finish. |
| 🪵 Laminated + Timber Hang Rails | Laminated chart mounted between natural timber rails with hanging cord — ready to hang. Allow up to 10 working days. |
| 🪵 Canvas + Timber Hang Rails | Canvas finished with lacquered natural timber rails for an elegant frameless maritime display. Allow up to 10 working days. |
📐 Size
745 mm (W) × 1000 mm (H)
A tall portrait-format wall map that beautifully emphasises the long reef-lined Queensland coast and the intricate maze of coral passages.
🎯 Ideal For
-
Maritime and naval history collectors
-
Yacht clubs and sailing institutions
-
Museums and libraries
-
Reef researchers and environmental centres
-
Anyone fascinated by the Great Barrier Reef
🤝 Our Commitment
-
Printed in Australia with professional colour management
-
Archival pigment inks for long-term stability
-
Premium laminates and canvas for durability
-
Natural timber hang rails for elegant presentation
-
Hand-checked and carefully packed before dispatch
Before it became a wonder of the world, the Great Barrier Reef was a deadly frontier.
Choose your finish and bring the chart that first revealed it onto your wall.