- Australia ▾
- Topographic
▾
- Australia AUSTopo 250k (2025)
- Australia 50k Geoscience maps
- Australia 100k Geoscience maps
- Australia 250k Geoscience maps
- Australia 1:1m Geoscience maps
- New Zealand 50k maps
- New Zealand 250k maps
- New South Wales 25k maps
- New South Wales 50k maps
- New South Wales 100k maps
- Queensland 10k maps
- Queensland 25k maps
- Queensland 50k maps
- Queensland 100k maps
- Western Australia 25k maps
- Western Australia 50k maps
- Western Australia 100k maps
- Compasses
- Software
- GPS Systems
- International ▾
- Wall Maps
▾
- World
- Australia & New Zealand
- Countries, Continents & Regions
- Historical
- Vintage National Geographic
- Australian Capital Territory
- New South Wales
- Northern Territory
- Queensland
- South Australia
- Tasmania
- Victoria
- Western Australia
- Celestial
- Children's
- Mining & Resources
- Wine Maps
- Healthcare
- Postcode Maps
- Electoral Maps
- Nautical ▾
- Flags
▾
- Australian Flag Sets & Banners
- Flag Bunting
- Handwavers
- Australian National Flags
- Aboriginal Flags
- Torres Strait Islander Flags
- International Flags
- Flagpoles & Accessories
- Australian Capital Territory Flags
- New South Wales Flags
- Northern Territory Flags
- Queensland Flags
- South Australia Flags
- Tasmania Flags
- Victoria Flags
- Western Australia Flags
- Gifts ▾
- Globes ▾
Dear valued customer. Please note that our checkout is not supported by old browsers. Please use a recent browser to access all checkout capabilities


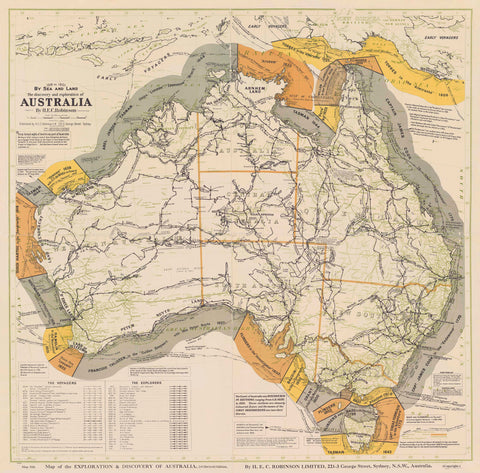
Adelaide to Port Darwin Overland Telegraph Line Wall Map 1872
$59.95
or make 4 interest-free payments of
$14.99 AUD
fortnightly with
![]() More info
More info
Adelaide to Port Darwin Overland Telegraph Line — Wall Map (1872)
A wire across a continent: this 1872 plan gathers the Adelaide–Port Darwin Overland Telegraph Line into one spare, elegant field of engineering and resolve. From the settled south to the tropics of the north, the route threads through ranges, rivers and red country; repeater stations step the signal across vast distances; towns and tracks sit back as the line holds the page. Part blueprint, part nation-making story, it lets a turning point in Australian communications live on your wall—clear, purposeful and quietly electrifying.
Why it captivates
-
Continent-spanning achievement (1872) — the overland link that connected Australia to the world’s telegraph network.
-
Primary-source pedigree — compiled from official documents supplied by the Superintendent of Telegraphs.
-
Engineering meets geography — the line, stations and route logic shown against rivers, ranges and settlements.
-
Scholarly & beautiful — disciplined draughting and calm typography that read cleanly from across the room.
What you’ll see
-
Continuous telegraph route from Adelaide to Port Darwin, rendered with lucid linework.
-
Named telegraph/repeater stations and depots stepping the signal north.
-
Reference geography—coastline, rivers, ranges and key townships for orientation.
-
Period finish preserved—titlework, neatline and a balanced type hierarchy for places and features.
A richer historical frame
Completed in 1872, the Overland Telegraph collapsed communication times from months to hours, tying the southern colonies to global news, commerce and science via the submarine cable at Darwin. This plan—drawn from official sources—captures that hinge of modernity: evidence arranged with care, where a single wire taught a continent new habits of time.
Choose your finish
Heavyweight Paper (160 gsm matte)
Best for: framing under glass in studies and living spaces
Look & feel: non-glare matte that preserves fine linework and small labels
Laminated (true encapsulation)
Best for: classrooms, libraries, offices and shared spaces
Build: sealed edge-to-edge between two 80-micron gloss sheets
Benefit: wipe-clean, durable, moisture-resistant
Laminated + Timber Hang Rails (Ready to hang)
What you get: encapsulated print plus natural lacquered timber rails top & bottom with a discreet hanging cord
Where it shines: foyers, councils, museums—polished look with everyday toughness
Install: arrives ready to hang (just add a wall hook)
Lead time: please allow up to 10 working days for professional rail mounting
Archival Canvas (395 gsm HP Professional Matte)
Best for: premium interiors, boardrooms and galleries
Print system: pigment-based, fade-resistant inks for long display life
Presence: textured surface adds warmth and museum-style depth
Canvas + Timber Hang Rails (Gallery-ready)
What you get: canvas fitted with natural timber rails top & bottom, matching cord
Where it shines: statement walls, curated heritage displays
Install: ready to hang; single-hook friendly
Lead time: please allow up to 10 working days for rail mounting
Sizes (W × H)
-
1000 × 457 mm — wide, landscape format that mirrors the long north–south sweep of the line
At-a-glance materials
| Option | Best for | Key benefits |
|---|---|---|
| Paper (160 gsm) | Framing under glass | Matte clarity; crisp period detail |
| Laminated (encapsulated) | Busy/shared spaces | Wipeable; tough; edge-to-edge protection |
| Laminated + Rails | Ready-to-hang public display | Professional mount; easy install; durable |
| Canvas (395 gsm) | Premium display | Archival inks; textured depth; gallery appeal |
| Canvas + Rails | Gallery-ready feature | Period-true presentation; simple hanging |
Styling ideas
-
Innovation wall: pair with a small caption on dates, key station names and cable connections.
-
Council or museum foyer: choose Laminated + Rails for a polished, robust display.
-
Study or boardroom: canvas with rails above timber cabinetry for warmth and authority.
-
Research nook: frame the paper edition; keep a magnifier handy for stations and river crossings.
Specifications
| Detail | Description |
|---|---|
| Title | Adelaide to Port Darwin Overland Telegraph Line — Wall Map |
| Edition | 1872 |
| Sources | Compiled from official documents supplied by the Superintendent of Telegraphs |
| Region | South Australia to Port Darwin (NT) corridor |
| Type | Engineering/communications route map |
| Content Highlights | Telegraph line route; named stations/depots; reference rivers, ranges & townships; period lettering & neatline |
| Finishes | Paper; Laminated (encapsulated); Laminated + Timber Rails; Canvas; Canvas + Timber Rails |
| Lead Time (Rails) | Up to 10 working days (laminated or canvas with rails) |
| Orientation | Landscape |
| Size | 1000 × 457 mm (W × H) |
| Production | Made in Australia |
Who it’s for
-
Historians, educators & collectors of Australian communications and infrastructure
-
Councils, libraries & museums curating nation-building stories
-
Designers & homeowners seeking refined, purposeful 19th-century cartography
Claim your wall. Choose Paper for crisp, frame-ready clarity. Go Laminated + Timber Rails for tough, ready-to-hang polish. Step up to Archival Canvas + Timber Hang Rails for gallery weight. Printed in Australia with pigment-based, fade-resistant inks. Built to last. Hang it. Live with it. Keep the line alive.
Frequently Asked Questions
What are the dimensions of the Adelaide to Port Darwin Overland Telegraph Line Wall Map 1872?
Mapworld wall maps range from standard 700×1000mm to large-format 1000×1430mm Supermaps. The exact dimensions for this map are shown in the product title. Where multiple sizes are available, select your preferred size when adding to cart.
Is this wall map available laminated?
Many Mapworld wall maps are available in paper, laminated, or framed finishes. Check the product options when adding to cart. Laminated maps are wipe-clean and more durable.
Is this the latest edition?
Mapworld stocks the most current editions available from all publishers. Edition year is shown in the product title where applicable. Mapworld updates its catalogue as new editions are released.
Can I write on or pin this wall map?
Laminated wall maps can be written on with whiteboard markers and wiped clean. Paper maps can be pinned on a corkboard. Choose a laminated option for a writeable surface.
Does Mapworld ship the Adelaide to Port Darwin Overland Telegraph Line Wall Map 1872 across Australia?
Yes, Mapworld ships Australia-wide. Standard shipping is a flat $7 rate, with free standard shipping on orders over $75. Express options are available at checkout. Most orders placed before 2pm AEST on weekdays are dispatched same day.
Related Items


© 2026 Mapworld. Website designed by Genie Media
X